

If you have a Drupal website you are no doubt aware that Drupal 7 & 8 will soon reach end-of-life. Part of your plan for the next 12 months needs to be getting your website migrated onto Drupal 9.
This might understandably feel a little daunting, but fear not, we can help! We have recently migrated our own website from Drupal 8 to Drupal 9, and while at times it was a little tricky, it wasn’t as big, scary, or painful as you might think. It of course helps when you have a skilful team of Drupal experts that researched, tested, de-bugged, and deployed this core versional upgrade.
Here’s an overview of the steps we took to make this happen:
-
Before we get started, we need to deal with those on Drupal 7
Unfortunately getting from Drupal 7 to Drupal 9 isn’t as simple as the D8 to D9 transition. This is especially important seeing as how Acquia themselves state that 60% of current Drupal users are still on Drupal 7. This is a significant proportion and represents a challenge which Acquia acknowledged in a recent blog called “Migrating from Drupal 7 to Drupal 9? Acquia has your back”.
Here they walk through the Acquia Migrate Accelerate tool, which they state is the first and only tool to support Drupal 7 to Drupal 9 migrations. If you’re on Drupal 7 this is definitely an option worth exploring, however there are pre-requisites such as having to be on the Acquia Cloud Platform as an Enterprise customer, for example. This host migration is another project in of itself.
We’ve migrated a few clients from Drupal 7 to 8. The migration from 8 to 9 is then fairly smooth if you know what you’re doing given that D8 is actually built in D9.
If you’re on Drupal 7, get in touch, we can help you assess your options.
-
Re-create your Drupal 8 site. Locally
Firstly, don’t start this process on your development or staging environments (and obviously not on your production environment!). As you work on the upgrade from Drupal 8 to 9 things will naturally break and require fixing. You don’t want to be doing this on active environments. Simply create a new Drupal 8 instance locally, import all old site data and modules, then begin the migration process on this local site.
Top tip – Ensure you use the PHP Composer to install your Drupal version and manage the dependencies throughout the upgrade.
-
Install the Upgrade Status Tool & analyse your readiness
Once you have a version of your site running locally, install the Upgrade Status tool. This will give you a percentage score for how close you are to reaching Drupal 9 upgrade ‘readiness’ and an overview of what needs to be done. Your first job on getting this installed will be getting your core technology up to the latest versions:
-
Get your Drupal 8 site upgraded to version 8.9
-
Check your PHP version is at least 7.3.0
-
Ensure you are on MySQL 5.7.8
-
Ensure you are on Apache 2.4.7
-
Check Drush in minimum version 10
Top Tip: Make sure you install PHPStan. This is essential, otherwise the Upgrade Status Tool could give you incorrect information or false positives.
Top Tip 2: If you are using Windows Dev Desktop, you may have to modify the Upgrade Status tool to make it compatible. We had to do this and can share how.

-
Remove unused modules is first
There are 3 key steps to getting your Drupal 8 site ready for the upgrade to Drupal 9 once your core technology has been brought up to the latest versions:
-
Remove Unused Modules
-
Update Used Modules & Plug-Ins
-
Make Manual Fixes
The first one here is removing the unused modules. This is likely to just be modules that the Upgrade Status Tool detects is not being used anywhere, which of course won’t be a problem, however what you need to hope here is that nothing that needs to be removed is essential. If it is then you have a slight problem and will need to find a more recent module or plug-in. Get in touch if this happens.

-
Update user modules & plug-ins
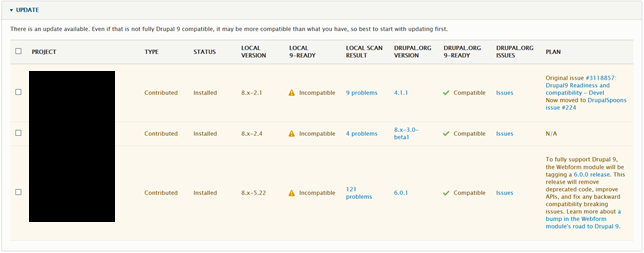
At this stage the Upgrade Status Tool will detect modules and plug-ins that are compatible with Drupal 9, but require some versional updates. The tool is pretty helpful in this. It will give you a full list of modules, which aren’t compatible, how many problems there are, and tell you exactly what you need to do. Check out the screenshot below.
This all sounds very simple but reality is often a little different. 90% of the updates for each of the individual modules will be simple, however there are bound to be the odd outlier modules & plug-ins that are maybe slightly more niche. The more niche and the older the module, the more likely you are to have to dedicate some time to it. The good news is that the folks at Drupal have already identified it can be fixed.
-
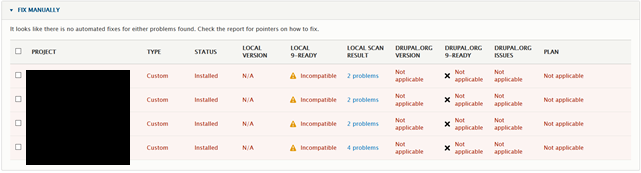
Make requested manual fixes
The final step to getting your Drupal 8 site readiness to 100% is fixing modules manually. This step is the answer to the question “How long is a piece of string?”. This might take 5 hours or 5 days, it really depends on how many slightly outdated modules or non-forwards compatible modules you are using.
One that will always appear here is your bespoke theme. This is fairly simple to fix manually if you know what you’re doing, however once again there might be some essential things in here, such as the plug-in you wrote to write your form data to your CRM system.
It’s at this point you need to revisit your project plan. Ensure you build in significant time at the start of the project for this stage. You might not need it, however it’s good to be prepared and allows you to manage your stakeholders’ expectations.
-
Get to 100%. Then run the upgrade LOCALLY– with a few preparatory steps
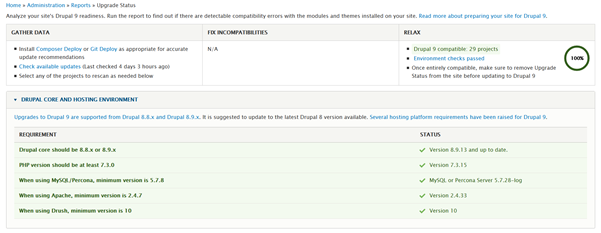
You did it! Everything has turned a lovely shade of green and it says 100%, that has to be good right?
Well yes of course, but at this stage you still want to be a little cautious and ensure you get the upgrade done locally before you push into your dev environment. Reduce your risk.
Firstly, create another copy of your ready to upgrade site locally. This is important to back yourself up and back all your work up in-case something catastrophic goes wrong. Next, on this duplicated environment, run the upgrade through the Drush command line.
Once you receive the success message it might not work straight away. It will take a couple of minutes to compile. At that point ensure the cache is cleared manually by logging in to the back-end, then hey-presto, your Drupal 9 site should be working!
That’s of course the best case scenario. In a worst case scenario, you’ll need to go through the PHP logs to find the errors, then attempt to fix them manually.
Top-Tip: On a Windows sub-system there will be a bunch of errors. Don’t panic. This is all fixable.
-
Get the upgrade on your dev environment, and test, test, test
When you have Drupal 9 running locally, and you’re happy all the risk has been mitigated, it’s time to get your dev environment upgraded. You of course need to check there is nothing critical on dev, no big dependencies, or time sensitive deployments happening. You need to pick a good 2-week window for a dev freeze.
When you are ready, take the PHP composer file from the ready to upgrade site, run that on dev site, and copy over the modules. Your PHP composer file is the most important part of this upgrade. It will hold all of the work you have done to remove, update, manually fix, and de-bug your Drupal 8 to Drupal 9 upgrade. It is in essence the upgrade ‘memory’.
Top-Tip: Remove the Upgrade Status Tool before updating to Drupal 9. Ironically, it isn’t compatible with Drupal 9!
In theory, given you have done all the work to de-bug and fix locally, the upgrade on the dev site should be smooth. It is at this stage your QA process needs to kick-in. You will need to test every element of the site both front-end and back-end to ensure the upgrade hasn’t caused any major functional issues, i.e. form validation, CRM integration, CMS editability, etc.
From here on out it’s a case of following your normal deployment procedures to get your shiny new Drupal 9 site live. Congratulations, you did it, however let’s also not forget that Drupal 10 is coming in June of 2022 - but let’s not get ahead of ourselves!
If you need any development help or consultancy on your Drupal 7 or 8 site upgrade to Drupal 9, please do let us know, we’d be happy to help.
For all you Drupal developers out there using Acquia’s Cloud hosting, you will also be aware that Acquia Dev Desktop will also reach end-of-life in 2021. This poses a new challenge, but another we’ve already solved with a tool called Lando. A blog on how to use this is coming soon courtesy of our Senior UX Developer, Dan Elliott.
Get In Touch
Post Information
| Author | Ross Britton |
| Channel | Website |